
The story of a little cabin in the woods is not usually one that begins with something new. It begins with something old, a structure that already exists somewhere, already has a history, and needs to be moved, or a building already on the land that needs to be taken apart and put back together correctly. Heritage log cabin restoration is a niche process, but it is a well-documented one, and the people who have done it consistently describe it as one of the most satisfying projects in rural homesteading.
How to Find a Heritage Log Cabin to Purchase and Move
Buying an old log home to move onto your land requires finding it first. Heritage log structures available for relocation appear on Kijiji, Facebook Marketplace, local agricultural forums, and occasionally through heritage preservation societies and demolition companies. The critical factor is the log species and condition: a BC coastal log cabin built from Douglas fir or western red cedar in the early twentieth century is worth moving. A structure with widespread rot, insect damage through the structural logs, or mortar chinking that has deteriorated past the point of repair may not be.
Before acquiring any structure, commission an inspection by a builder with heritage log experience. Probe each visible log with an awl or ice pick – solid wood resists; rotted wood accepts the tool with minimal pressure. Surface checking and grey weathering are normal. Rot that extends more than an inch into the log is a structural problem.
Log cabins are legally moved in BC as structures rather than manufactured homes, which means the permitting process is different. A Building Permit from the Regional District is required for placement on the new site. ALR zoning (if the destination property is inside the Agricultural Land Reserve) does not prohibit a residential structure, but the principal residence floor area cap of 500 m² applies.
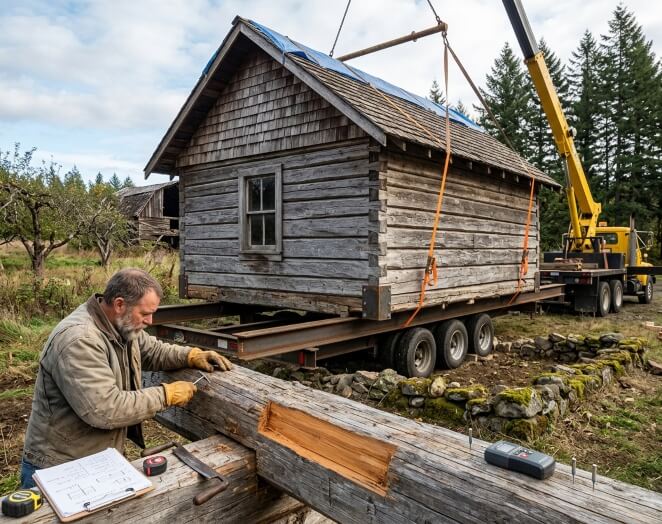
What It Costs to Move a Heritage Log Cabin
A heritage log cabin that is being relocated must be disassembled log by log, numbered, transported, and reassembled on the new foundation. This is not the same as moving a manufactured home on a trailer. There is no shortcut.
Stage | What It Includes | Approximate Cost (CAD) |
|---|---|---|
Disassembly | Log by log, numbered, crane if needed | $8,000–$18,000 |
Transport within BC | Under 200 km; escort vehicles if required | $3,000–$9,000 |
Foundation preparation | Perimeter or pier footings at new site | $5,000–$15,000 |
Full restoration | Re-chinking, roof, windows, electrical, plumbing | $40,000–$120,000+ |
Contingency | Budget 20–30% above initial estimate | — |
The total cost of moving and restoring a heritage log cabin is almost always higher than the initial estimate. Budget a 20–30% contingency from the beginning. The people who are most satisfied with the process are those who treated the first cost estimate as a floor, not a ceiling.
Log Cabin Restoration: What to Address First
The correct restoration sequence matters as much as the work itself. Foundation first: a level, stable base eliminates the compounding problems that come from a structure that continues to settle after work is done. Roof second: a dry interior is the precondition for every other repair. Logs third: replace or sister any structural logs with significant rot before closing the walls. Chinking fourth: modern chinking compounds (Perma-Chink, Log Jam, and similar products) are far superior to historic mortar and allow movement as the logs continue to dry. Electrical and plumbing last.
Log checking, the lengthwise cracks that develop as logs dry, is not structural damage. Heritage log builders position checks to face downward where possible to prevent water pooling. Checks do not need to be filled.
The exterior finish debate among heritage log owners is consistent: most purists reject stain and oil products that darken logs toward an artificial brown. A clear, UV-blocking penetrating oil finish, reapplied every 3–5 years on weather-exposed faces, protects the wood without changing its character.
Small Log Cabin Interior Design: Low Ceilings and Odd Angles
A heritage log cabin interior is defined by its limitations, and those limitations are worth working with rather than against. Low ceilings, often 7 feet or under, require a different approach to lighting: surface-mounted fixtures and sconces rather than pendants, light-coloured upper walls to push the visual ceiling upward, and an absence of heavy overhead elements that compress the space further.
Odd angles are a feature. Saddle-notch corners, exposed log ends, irregular wall surfaces – these are not problems to be corrected. Furniture that floats slightly away from the walls works better than pieces pushed flush against the irregular log surfaces. Built-in shelving and benches that follow the wall profile work exceptionally well in log cabins precisely because they can be scribed to fit the irregularities that standard furniture cannot accommodate.
Mixing Vintage and Modern in a Rural Interior
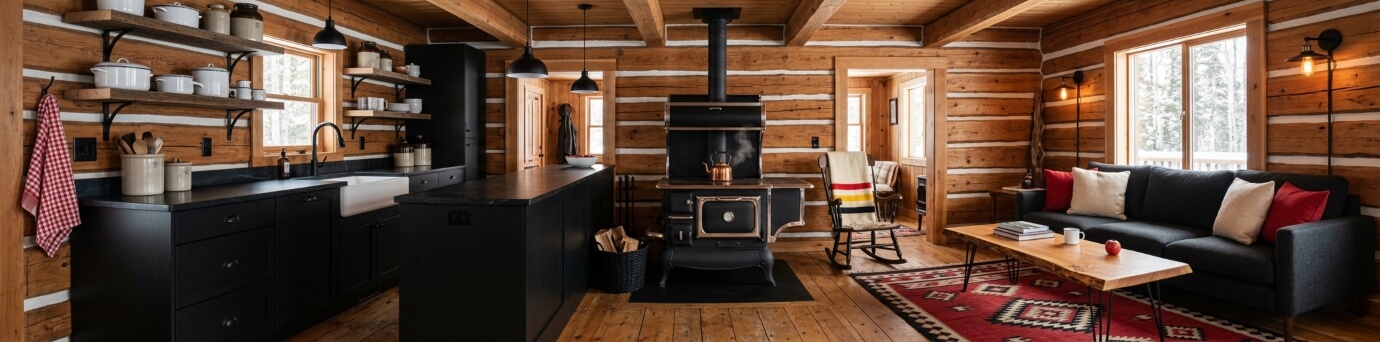
A decor of black, white and red is one of the most successful palettes for heritage cabin interiors, and for a straightforward reason: it does not compete with the logs. The wood is already the dominant visual material. A palette that introduces a third strong colour, a deep red, a dark green, either works with the wood tone or fights it. Black and white are neutral enough to let the logs remain primary.
Creative ways to mix the old and the new: cast iron hardware on modern cabinetry; vintage enamelware and stoneware on open shelves; contemporary wool textiles in natural colours. The test for any decorative decision in a heritage cabin is whether it looks like it could have arrived there over time, rather than being placed deliberately all at once.
Period-appropriate lighting is the single easiest way to establish interior coherence. Simple pendant shades in black or white enamel, barn-style sconces, and exposed-bulb fixtures in Edison or globe form all read as compatible with heritage interiors without being costume.
Cast Iron Sink Refinishing: The Process
Cast iron sinks are among the most durable fixtures ever manufactured. A sink from 1920 is still structurally sound in 2026 if the cast iron itself is intact. What fails is the enamel coating. Refinishing a cast iron sink is not the same as true re-porcelaining: DIY epoxy-based kits produce a coating that mimics enamel but does not fire at the temperatures that create the original porcelain bond. True re-porcelaining requires a kiln and a specialist and costs considerably more.
For most heritage cabin sinks that have chips, staining, and light rust but structurally sound iron, a DIY refinish is the practical choice. Professional refinishing runs $300–$500 CAD. A DIY kit (Rustoleum Tub and Tile, Homax Tough as Tile) costs $35–$60.
The DIY process in sequence:
- Clean thoroughly. Non-abrasive cleanser first (Bar Keepers Friend works for most staining). For rust: Iron Out or a wire wheel on stubborn spots.
- Address chips. Epoxy filler (Bondo or similar) applied in thin layers, allowed to cure fully between coats. Wet-sand smooth once above the original surface height.
- Sand the entire surface with 220-grit wet-and-dry sandpaper. This gives the refinishing product something to bond to.
- Apply the refinishing product in three thin coats using a foam roller. Allow one hour between coats. Work quickly – the epoxy sets fast.
- Cure for 72 hours minimum before use. Do not rush this. Early use before full cure is the most common cause of peeling.
The result is not identical to original porcelain – the sheen is slightly different and the durability somewhat lower. It is, however, significantly better than a replacement for any heritage sink where the cast iron body is intact and the character of the original piece matters.
Storage Without Closets: Armoires, Baskets, and Built-Ins
Living without closets is not a hardship in a heritage cabin – it is an organising constraint that, followed correctly, tends to produce neater living than closets do. Closets accumulate; open storage does not.
The most functional approach: one large armoire per bedroom for hanging clothes and folded items. Open basket systems under beds for seasonal storage. Mudroom hooks and open shelving at the entrance for outerwear and gear. Kitchen: open shelves rather than upper cabinets, which read better against log walls and force a discipline about what stays on them.
Built-in benches with lifting-lid storage work particularly well in log cabin entries and along gable walls where ceiling height reduces the available usable volume. A bench-height lid-storage unit can hold everything a coat closet would hold without competing visually with the log walls behind it.
650 Square Feet: What Small-Cabin Living Teaches About Space
Six hundred and fifty square feet forces prioritisation. There is no room for things that are not used regularly, furniture that does not earn its footprint, or a division of rooms that creates unusable transitional space. Heritage cabins of this size were designed by necessity into exactly this discipline, and it turns out that necessity produced better spatial thinking than the sprawl of modern square footage typically allows.
The three rules that small-cabin residents consistently report: every piece of furniture must serve more than one purpose (bench with storage, table that extends, bed with drawers underneath); vertical space must be used (shelving to the ceiling, ladder for access); and the outdoor space must function as an extension of the interior (covered porch as a second living room, root cellar as pantry overflow).
For how wood heat integrates into the practical daily structure of a cabin this size, see firewood basics and cord of wood. For the broader context of adjusting to rural property life, see adjusting to rural living.